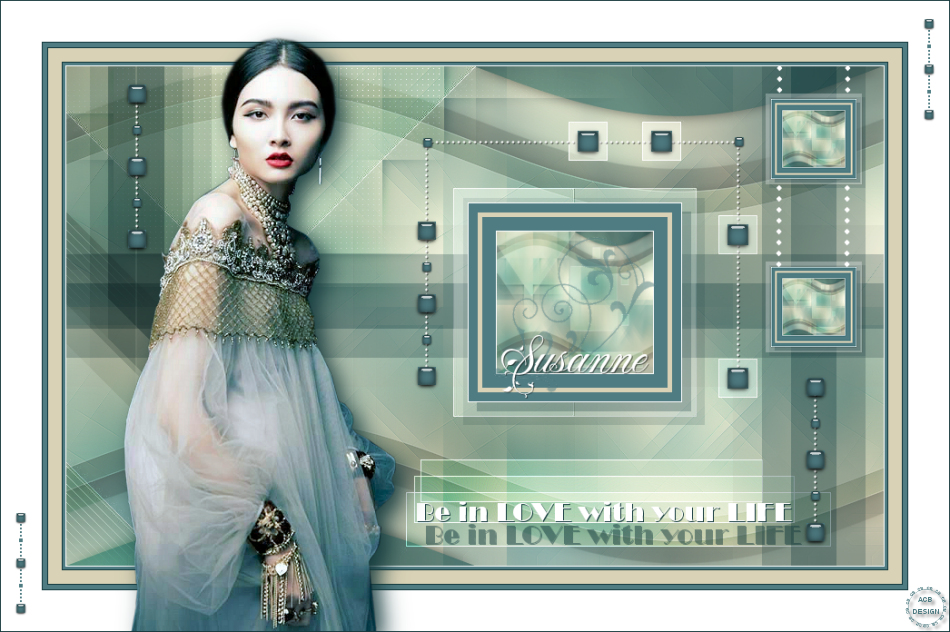
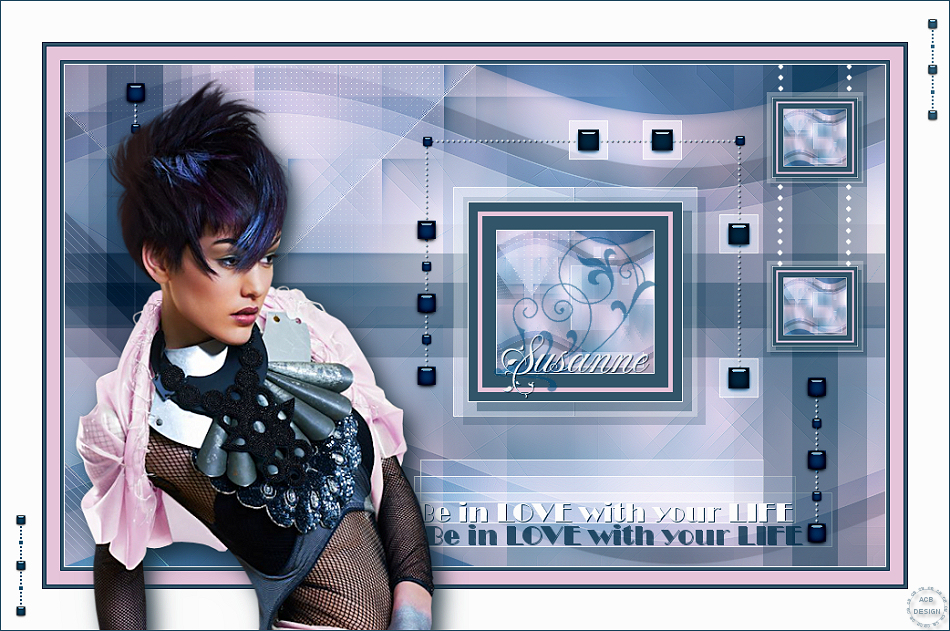
The tutorial:
******
01
Open "TD_Canal_Alfa_Susanne" (This
image contains Alpha Selections)
Rename this image Raster 1
02
Effects - Plugins - Mehdi - Wavy Lab
1.1
Adjust - Blur - Gaussian Blur -
Radius: 35
03
Layers - Duplicate
Image - Resize - 70% - Resize All
Layers - Not Checked
Image - Mirror - Mirror Horizontal
Effects - Edge Effects - Enhance
Layers - Merge - Merge Down
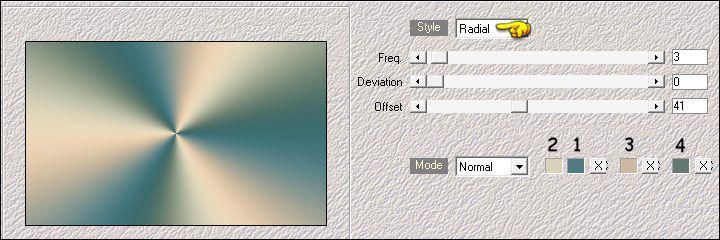
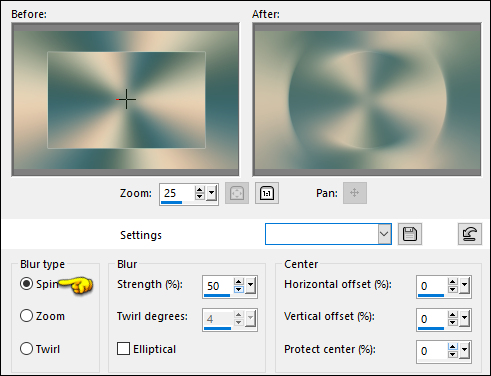
04
Adjust - Blur - Radial Blur
05
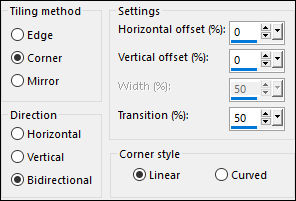
Effects - Image Effects - Seamless
Tiling - Default settings
Adjust - Blur - Gaussian Blur - Radius: 35
06
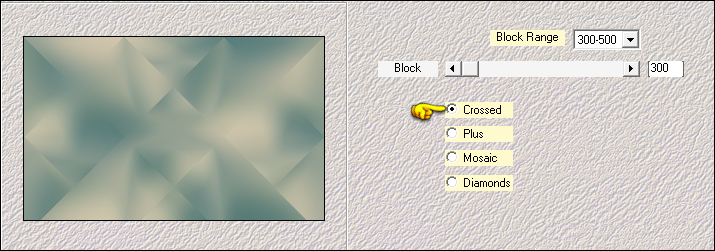
Effects - Plugins - Mehdi - Sorting
Tiles - Crossed
Effects - Edge Effects - Enhance
07
Layers - Duplicate
Image - Resize - 70% - Resize All Layers - Not Checked
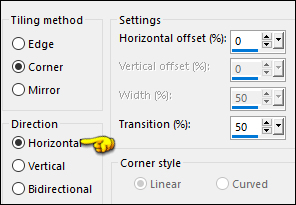
Effects - Image Effects - Seamless
Tiling
Effects - Edge Effects - Enhance
08
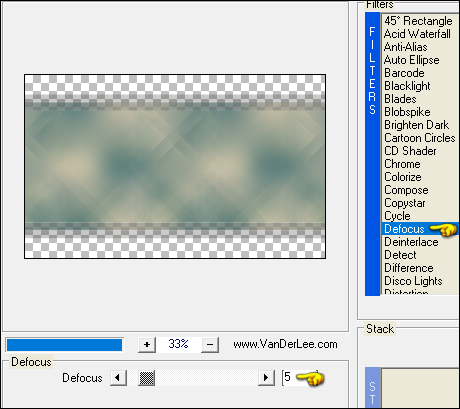
Effexts - Plugins - VanDerLee -
Unplugged X - Defocus
09
Effects - Distortion Effects - Wave

Change the Blend Mode to Hard
Light and lower the Opacity to 60
Effects - 3D Effects - Drop Shadow:
0/0/60/20 Color:(5) #13383b

10
Activate the Bottom Layer (Raster 1)
Layers - Duplicate
Layers - Arrange - Bring to Top
Image - Mirror - Mirror Horizontal
Adjust - Blur - Gaussian Blur - Radius: 35
11
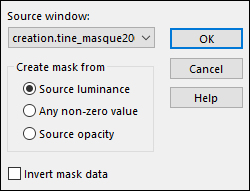
Layers - New Mask Layer - From Image -
"creation.tine.masque206"
Layers - Merge - Merge Group
Effects - Edge Effects - Enhance
Change the Blend Mode to
Overlay
12
Activate the Bottom Layer (Raster1)
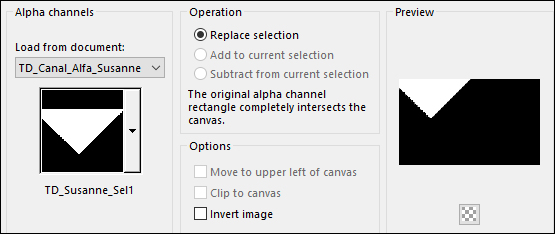
Selections - Load/Save - Load
Selection From Alpha Channel - "TD_Susanne_Sel1"
Selections - Promote Selection to
Layer
Selections - Select None
Layers - Arrange - Bring to Top
13
Effects - Plugins - Toadies - Weaver -
Default settings

14
Effects - Plugins - Carolaine and
Sensibility - CS-LDots
Change the Blend Mode to Hard
Light
Effects - 3D Effects - Drop Shadow: 0/0/60/20
Color:(5) #13383b
15
Activate the Bottom Layer (Raster1)
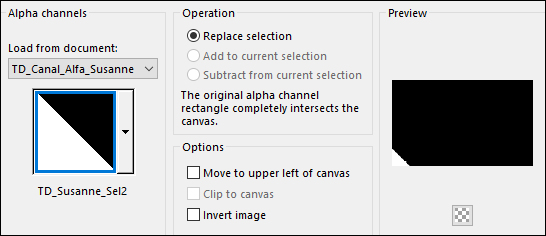
Selections - Load/Save - Load Selection From Alpha
Channel - "TD_Susanne_Sel2"
Selections - Promote Selection to
Layer
Selections - Select None
Layers - Arrange - Bring to Top
16
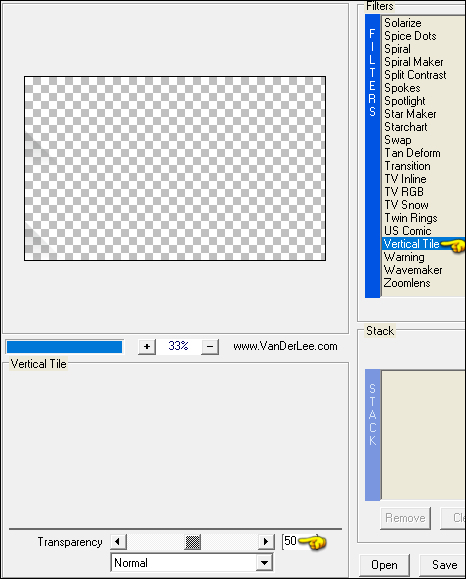
Effects - Plugins - VanDerLee -
Unplugged X - Vertical Tile
17
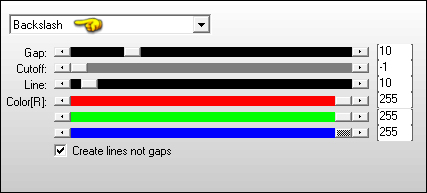
Effects - Plugins - AP [Lines] - Lines
- SilverLining - Backslash
Change the Blend Mode to Hard Light
Effects - 3D Effects - Drop Shadow: 0/0/60/20
Color:(5) #13383b
18
Activate the Bottom Layer (Raster1)
Effects - Plugins - DC Special -
Stakker
19
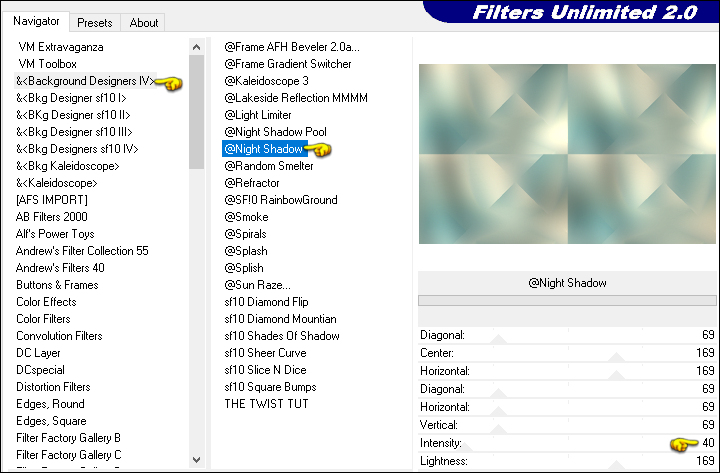
Effects - Plugins - Filters Unlimited
- &<Background Designers IV. - @NightShadow
20
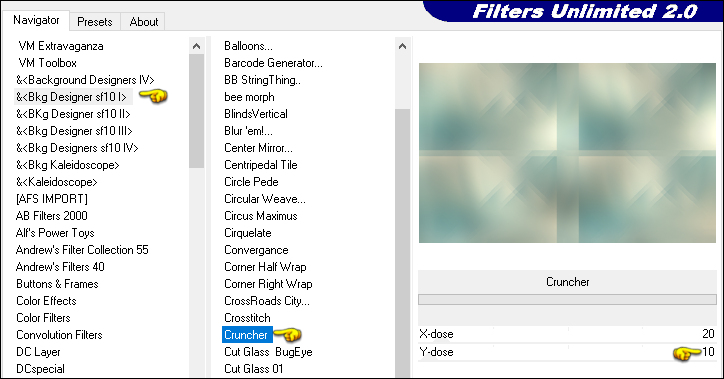
Effects - Plugins - Filters Unlimited - &<Bkg Designer
sf10 I> - Cruncher
21
Edit - Copy Special - Copy Merged
Edit - Paste -
Paste As New Image
Put this image to one side for now
22
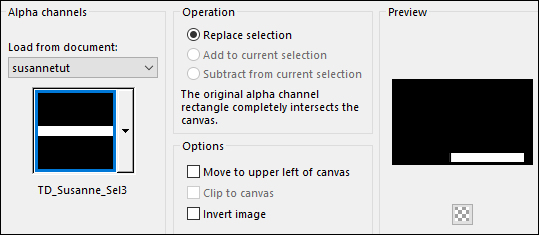
Activate Group
Copy of Raster 1
Selections - Load/Save - Load
Selection From Alpha Channel - "TD_Susanne_Sel3"
Selections - Promote Selection to
Layer
Selections - Select None
23
Image - Resize - 90% - Resize All
Layers - Not Checked
Effects - Edge Effects - Enhance
Change the Blend Mode to
Overlay
Layers - Duplicate
Image - Resize - 90% - Resize All Layers - Not Checked
24
Activate the Top Layer
Layers - New Raster Layer
Selections - Load/Save - Load Selection From Alpha
Channel - "TD_Susanne_Sel4"
25
Flood Fill Tool (F) Lower the Opacity
to 50 on the Toolbar
Fill the Selection with (5) #13383b
Raise the Opacity back to 100
on the Toolbar
Selections - Select None
26
Effects - Plugins -
It@lian
Editors Effect - Effetto Fantasma
Edit - Repeat Effetto Fantasma
27
Layers - Duplicate
Image - Free Rotate
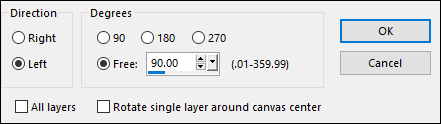
28
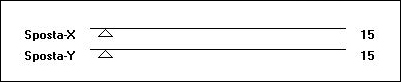
Pick Tool (K)

Enter these parameters for the X: and
Y: positions on the Toolbar
X: 734.00 Y: -152.00
Press M to close the
Pick Tool
29
Layers - Duplicate
Image - Mirror - Mirror Horizontal
Effects - Geometric Effects - Skew
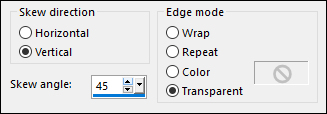
Image - Mirror - Mirror Vertical
30
Effects - Plugins -
It@lian
Editors Effect - Effetto Fantasma -
Same settings
Change the Blend Mode to
Multiply
31
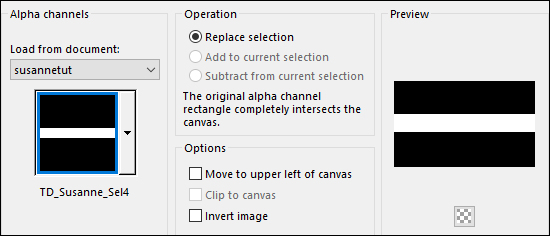
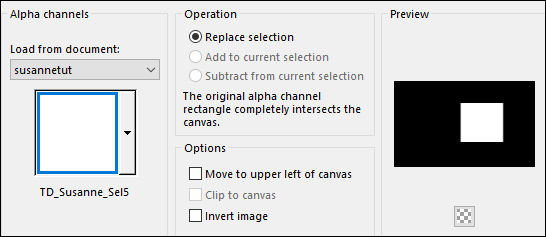
Layers - New Raster Layer
Selections - Load/Save - Load Selection From Alpha
Channel - "TD_Susanne_Sel5"
32
Flood Fill Tool (F) Lower the Opacity
to 30 on the Toolbar
Fill the Selection with (5) #ffffff

Raise the Opacity back to 100
on the Toolbar
Selections - Modify - Contract - 15px
Fill the Selection with #ffffff
Keep the Selection
33
Selections - Modify - Contract - 1px
Fill the Selection with (1) #4e7c82

Selections - Modify - Contract - 10px
Fill the Selection with (2) #d9d2b7

Keep the Selection
34
Selections - Modify - Contract -5px
Fill the Selection with (1) #4e7c82
Selections - Modify - Contract - 15px
Fill the Selection with #ffffff
Selections - Modify - Contract - 1px
Keep the Selection
35
Activate the image saved in Step#21
Edit - Copy
On your work image: Edit - Paste
- Paste Into Selection
Selections - Select None
Effects - 3D Effects - Drop Shadow: 10/10/50/0
Color:(5) #13383b
36
Layers - Duplicate
Image - Resize - 40% - Resize All
Layers - Not Checked
Pick Tool (K)
Enter these parameters for the X: and
Y: positions on the Toolbar
X: 770.00 Y: 30.00
Press M to close the
Pick Tool
Adjust - Sharpness - Sharpen
37
Layers - Duplicate
Pick Tool (K)
Enter these parameters for the X: and
Y: positions on the Toolbar
X: 770.00 Y: 215.00
Press M to close the
Pick Tool
38
Open "TD_Deco1_Susanne"
from tray
Edit - Copy the Middle Layer
On your work image: Edit - Paste
- Paste As New Layer
Pick Tool (K)
Enter these parameters for the X: and
Y: positions on the Toolbar
X: 781.00 Y: -1.00
Press M to close the
Pick Tool
39
Layers - New Raster Layer
Selections - Load/Save - Load Selection From Alpha
Channel - "TD_Susanne_Sel6"
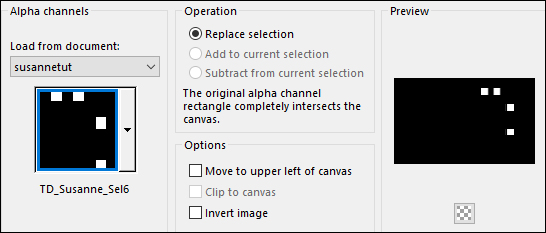
40
Flood Fill Tool (F) Lower the Opacity
to 30 on the Toolbar
Fill the Selection with (5) #ffffff
Raise the Opacity back to 100 on the
Toolbar
Selections - Modify - Contract - 9px
Fill the Selection with (1) #4e7c82
41
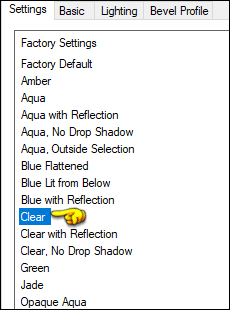
Effects - Plugins - Eye Candy 5 -
Impact - Glass - Preset - Clear
Selections - Select None
42
Open "TD_Deco2_Susanne"
from tray
Edit - Copy the Middle Layer
On your work image: Edit - Paste
- Paste As New Layer
Layers - Arrange - Move Down
Pick Tool (K)
Enter these parameters for the X: and
Y: positions on the Toolbar
X: 62.00 Y: 16.00
Press M to close the
Pick Tool
43
Open "TD_Texto_Susanne"
from tray
Edit - Copy the Middle Layer
On your work image: Edit - Paste -
Paste As New Layer
Pick Tool (K)
Enter these parameters for the X: and
Y: positions on the Toolbar
X: 386.00 Y: 479.00
Press M to close the
Pick Tool
Effects - 3D Effects - Drop Shadow: 1/1/100/0
Color:(5) #13383b
Effects - 3D Effects - Drop Shadow: 25/10/50/0
Color:(5) #13383b
44
Open "TD_WordArt_Susanne"
Edit - Copy the Middle Layer
On your work image: Edit - Paste -
Paste As New Layer
Pick Tool (K)
Enter these parameters for the X: and
Y: positions on the Toolbar
X: 470.00 Y: 188.00
Press M to close the
Pick Tool
45
Image - Add Borders - Symmetric
checked - 1px - (6) - #ffffff
Image - Add Borders - Symmetric checked - 3px - (1) -
#4e7c82
Image - Add Borders - Symmetric checked - 1px - (5) -
#13383b
Image - Add Borders - Symmetric checked - 15px - (2) -
#d9d2b7
Image - Add Borders - Symmetric checked - 1px - (5) -
#13383b
Image - Add Borders - Symmetric checked - 3px - (1) -
#4e7c82
Image - Add Borders - Symmetric checked - 1px - (5) -
#13383b
Image - Add Borders - Symmetric checked - 45px - (6) -
#ffffff
46
Open "TD_Deco3_Susanne"
from tray
Edit - Copy the Middle Layer
On your work image: Edit - Paste
- Paste As New Layer
Layers - Arrange - Move Down
Pick Tool (K)
Enter these parameters for the X: and
Y: positions on the Toolbar
X: 1015.00 Y: 19.00
Press M to close the
Pick Tool
47
Layers - Duplicate
Pick Tool (K)
Enter these parameters for the X: and
Y: positions on the Toolbar
X: 15.00 Y: 563.00
Press M to close the
Pick Tool
48
Open "vvs-woman1735"
from tray
Edit - Copy the second Layer from the
Top
On your work image: Edit - Paste -
Paste As New Layer
Image - Mirror - Mirror Horizontal
Image - Resize - 75% - Resize All
Layers - Not Checked
Pick Tool (K)
Enter these parameters for the X: and
Y: positions on the Toolbar
X: 135.00 Y: 38.00
Press M to close the
Pick Tool
Adjust - Sharpness - Sharpen
49
Effects - Plugins - Eye Candy 5 -
Impact - Perspective Shadow - Preset - "Drop
Shadow,Blurry
In the Basic Tab: Change the Shadow
Color to (5) #13383b
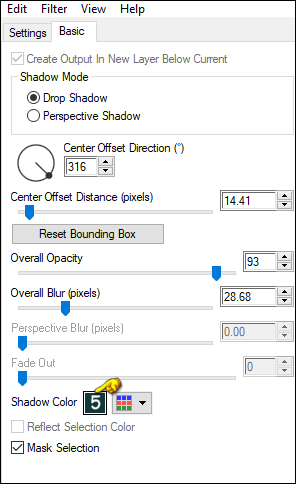
Image - Add Borders - Symmetric checked - 1px - (5) -
#13383b
50