Please read my Terms (TOU) before doing the tutorial.
Thank you for putting a link to this tutorial by showing your realization on a website, forum or in an email!
With your result, you can make signatures, websets, incredimail letters, etc.
Please, credit to Tati Designs, thank you.
This tutorial is dedicated to Misstyca, as a thank you for translating my tutorials into Hungarian.
Materials
PSPX9 (you can use any version).
Download the tutorial material here:

Filters:
Mehdi / Wavy Lab 1.1 y Sorting Tiles (download here).
Factory Gallery N / Flipper (download here).**
Penta / Jeans (download here).
Alien Skin Eye Candy 5: Impact / Glass (download here).
AAA Frames / Foto Frame (download here).
** Import this filter with "Unlimited".

IMPORTANT
It is forbidden to modify or rename files or remove the watermark.
Please do not use the material provided outside this tutorial.
Main tube by Misstyca. A mask is by Narah.
The rest of the material used in the tutorial is mine.

Preparation
Duplicate the tubes. Close the originals.
Install the Filters in the "Plugins" folder of your PSP.
In the "Selecciones" folder are 7 files, put them in the "Selections" folder of your PSP.
In the "Preset" folder is 1 file, double click
to install with filter Eye Candy 5 Impact.
Colors
Choose colors in harmony with your tube.
This is the tutorial palette:

If you use other colors, you must play with the Blend Mode and the Opacity of the layers.

≈ Step 1 ≈
In your Materials palette:
Set your Foregroundcolor to (2) #9a638d 
Set your Backgroundcolor to (1) #e290a8 
≈ Step 2 ≈
Open a new transparent image of 900 x 550 pixels.
≈ Step 3 ≈
Effects / Plugins / Mehdi / Wavy Lab 1.1:
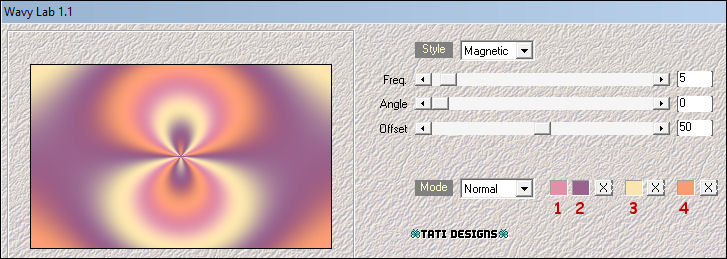
 #e290a8 |
 #9a638d |
 #fbe5af |
 #f89c74 |
≈ Step 4 ≈
Adjust / Blur / Gaussian Blur to 60.
≈ Step 5 ≈
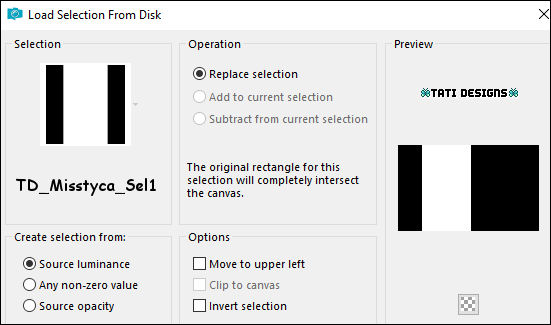
Selections / Load/Save / Load Selection from Disk: choose "TD_Misstyca_Sel1":
≈ Step 6 ≈
Selections / Promote Selection to Layer.
≈ Step 7 ≈
Selections / Select None.
≈ Step 8 ≈
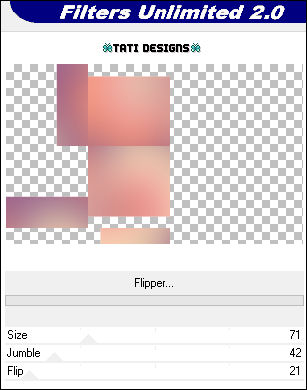
Effects / Plugins / Unlimited / Factory Gallery N / Flipper (default):
≈ Step 9 ≈
Adjust / Sharpness / Sharpen.
≈ Step 10 ≈
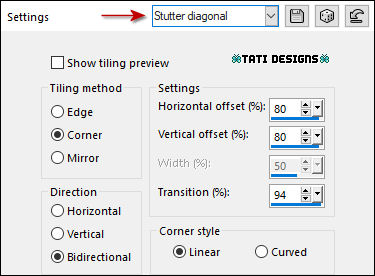
Effects / Image Effects / Seamless Tiling - Stutter diagonal:
≈ Step 11 ≈
Effects / Reflection Effects / Rotating mirror:
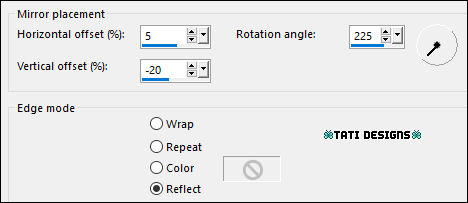
≈ Step 12 ≈
Layers / New Raster Layer and fill with the color #ffffff 
≈ Step 13 ≈
Open the mask "NarahsMasks_1524" and return to your work.
≈ Step 14 ≈
Layers / New Mask Layer / Fron Image:
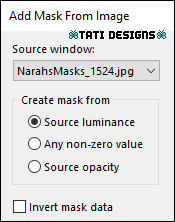
Layers / Merge / Merge Group.
≈ Step 15 ≈
Selections / Load/Save / Load Selection from Disk: choose"TD_Misstyca_Sel2":
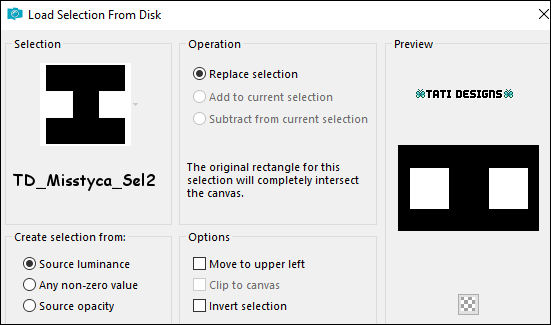
≈ Step 16 ≈
Press the "Delete" key on your keyboard.
≈ Step 17 ≈
Selections / Select None.
≈ Step 18 ≈
Effects / Plugins / Unlimited / Factory Gallery N / Flipper (default):
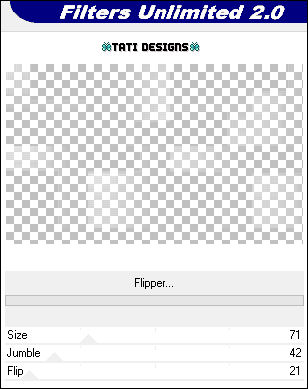
≈ Step 19 ≈
Adjust / Sharpness / Sharpen.
≈ Step 20 ≈
Change the Blend Mode to "Luminance (Legacy)".
≈ Step 21 ≈
Layers / New Raster Layer and fill with the color (6) #4a2546 
≈ Step 22 ≈
Open the mask "TD_Mask_Misstyca"and return to your work.
Note: Don't close it, we'll use it again.
≈ Step 23 ≈
Layers / New Mask Layer / Fron Image:
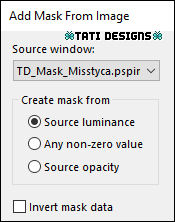
Layers / Merge / Merge Group.
≈ Step 24 ≈
Change the Blend Mode to "Soft Light".
≈ Step 25 ≈
Layers / Duplicate.
≈ Step 26 ≈
Open the tube "TD_Misted_Amanecer" and copy.
Return to your work and paste as new layer.
≈ Step 27 ≈
Activate Tool "Pick" (K) and modify the positions of X (0,00) and Y (-80,00):

Press the "M" key to deactivate the "Pick" Tool.
≈ Step 28 ≈
Change the Blend Mode to "Luminance (Legacy)" and lower the Opacity to 79.
≈ Step 29 ≈
Layers / New Raster Layer and fill with the color (5) #b6b4bf 
≈ Step 30 ≈
Layers / New Mask Layer / Fron Image:
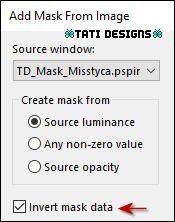
Before merging, duplicate the mask layer 2 times:
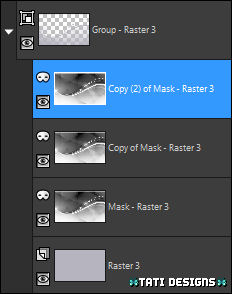
Layers / Merge / Merge Group.
≈ Step 31 ≈
Change the Blend Mode to "Luminance (Legacy)".
≈ Step 32 ≈
Effects / Plugins / Penta / Jeans (default):

≈ Step 33 ≈
Edit / Copy Special / Copy Merged.
≈ Step 34 ≈
Edit / Paste as new image.
Leave this image aside, we'll use it later.
≈ Step 35 ≈
Open the tube "TD_Deco1_Misstyca"and copy.
Return to your work and paste as new layer.
Note: Color according to your colors.
≈ Step 36 ≈
Activate Tool "Pick" (K) and modify the positions of X (51,00) and Y (0,00):

Press the "M" key to deactivate the "Pick" Tool.
≈ Step 37 ≈
Layers / New Raster Layer.
≈ Step 38 ≈
Selections / Load/Save / Load Selection from Disk: choose "TD_Misstyca_Sel3":

≈ Step 39 ≈
Activate the image that we had apart and copy.
Return to your work and paste as new layer.
≈ Step 40 ≈
Effects / Plugins / Eye Candy5: Impact / Glass and,
on "Settings",
select preset "TD_Glass_Misstyca":
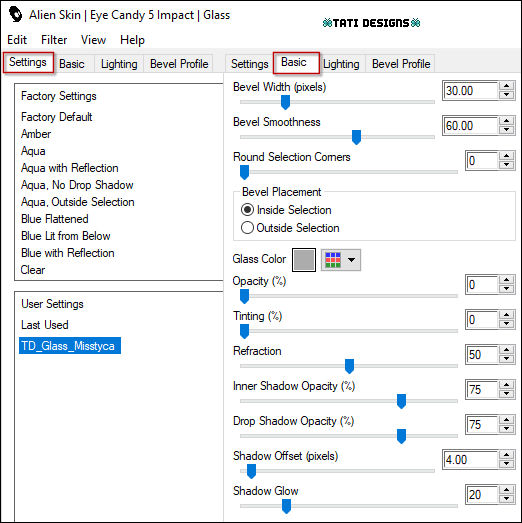
Note: If the preset hasn't been installed, in the "Basic" tab you have the settings.
≈ Step 41 ≈
Selections / Select None.
≈ Step 42 ≈
Selections / Load/Save / Load Selection from Disk: choose "TD_Misstyca_Sel4":
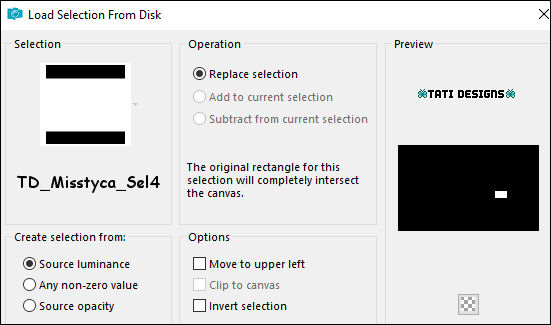
≈ PaStepo 43 ≈
Edit / Paste into selection.
≈ Step 44 ≈
Effects / Plugins / Eye Candy5: Impact / Glass and,
on "Settings",
select preset "TD_Glass_Misstyca".
≈ Step 45 ≈
Selections / Select None.
≈ Step 46 ≈
Selections / Load/Save / Load Selection from Disk: choose "TD_Misstyca_Sel5":
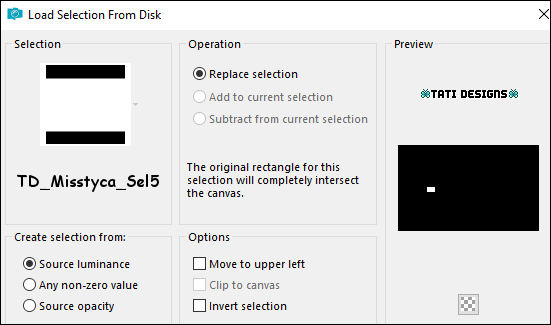
≈ Step 47 ≈
Edit / Paste into selection.
≈ Step 48 ≈
Effects / Plugins / Eye Candy5: Impact / Glass and,
on "Settings",
select preset "TD_Glass_Misstyca".
≈ Step 49 ≈
Selections / Select None.
≈ Step 50 ≈
Selections / Load/Save / Load Selection from Disk: choose "TD_Misstyca_Sel6":

≈ Step 51 ≈
Edit / Paste into selection.
≈ Step 52 ≈
Effects / Plugins / Eye Candy5: Impact / Glass and,
on "Settings",
select preset "TD_Glass_Misstyca".
≈ Step 53 ≈
Selections / Select None.
≈ Step 54 ≈
Layers / Merge / Merge Down.
≈ Step 55 ≈
Open the tube "TD_Deco2_Misstyca" and copy.
Return to your work and paste as new layer.
≈ Step 56 ≈
Activate Tool "Pick" (K) and modify the positions of X (39,00) and Y (33,00):

Press the "M" key to deactivate the "Pick" Tool.
≈ Step 57 ≈
Effects / 3D Effects / Drop Shadow: 0 / 0 / 80 / 20 / Color: (6) #4a2546 
≈ Step 58 ≈
Open the tube "TD_Texto1_Misstyca" and copy.
Return to your work and paste as new layer.
≈ Step 59 ≈
Activate Tool "Pick" (K) and modify the positions of X (56,00) and Y (410,00):

Press the "M" key to deactivate the "Pick" Tool.
≈ Step 60 ≈
Effects / 3D Effects / Drop Shadow: 0 / 0 / 40 / 20 / Color: (6) #4a2546 
≈ Step 61 ≈
Open the tube "TD_Texto2_Misstyca" and copy.
Return to your work and paste as new layer.
≈ Step 62 ≈
Activate Tool "Pick" (K) and modify the positions of X (78,00) and Y (36,00):

Press the "M" key to deactivate the "Pick" Tool.
≈ Step 63 ≈
Change the Blend Mode to "Soft Light".
≈ Step 64 ≈
Layers / Duplicate.
≈ Step 65 ≈
Open the tube "TD_Título_Misstyca" and copy.
Return to your work and paste as new layer.
≈ Step 66 ≈
Activate Tool "Pick" (K) and modify the positions of X (617,00) and Y (362,00):

Press the "M" key to deactivate the "Pick" Tool.
≈ Step 67 ≈
Effects / 3D Effects / Drop Shadow: 0 / 0 / 40 / 20 / Color: (6) #4a2546 
≈ Step 68 ≈
Layers / Merge / Merge Visible.
≈ Step 69 ≈
Effects / Plugins / AAA Frames / Foto Frame:
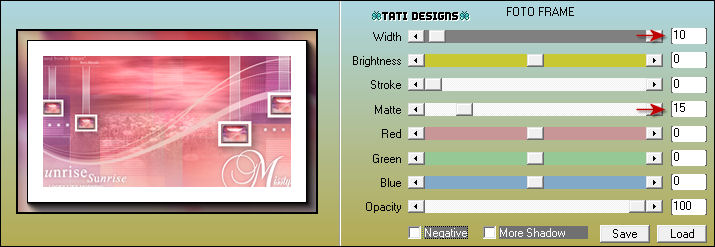
≈ Step 70 ≈
Image / Add Borders / Symmetric - 35 pixels / Color: #ffffff 
≈ Step 71 ≈
Selections / Load/Save / Load Selection from Disk: choose "TD_Misstyca_Sel7":
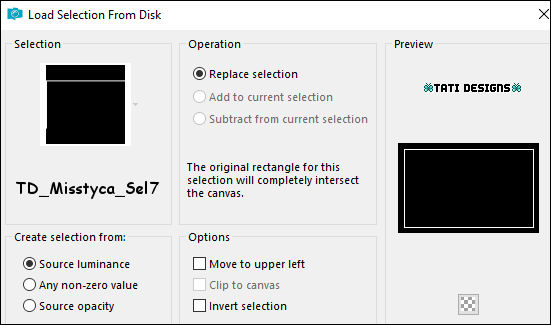
≈ Step 72 ≈
Selections / Promote Selection to Layer.
≈ Step 73 ≈
Effects / Plugins / Penta / Jeans (default).
≈ Step 74 ≈
Selections / Select None.
≈ Step 75 ≈
Open the tube "TD_Deco3_Misstyca" and copy.
Return to your work and paste as new layer.
Note: Color according to your colors.
≈ Step 76 ≈
Activate Tool "Pick" (K) and modify the positions of X (19,00) and Y (11,00):

Press the "M" key to deactivate the "Pick" Tool.
≈ Step 77 ≈
Layers / Duplicate. - Image / Mirror. -
Image / Flip.
≈ Step 78 ≈
Open the tube "Woman_40_Misstyca" and copy.
Return to your work and paste as new layer.
≈ Step 79 ≈
Activate Tool "Pick" (K) and modify the positions of X (376,00) and Y (18,00):

Press the "M" key to deactivate the "Pick" Tool.
≈ Step 80 ≈
Effects / 3D Effects / Drop Shadow: 0 / 0 / 70 / 35 / Color: (6) #4a2546 
≈ Step 81 ≈
Adjust / Sharpness / Sharpen.
≈ Step 82 ≈
Layers / New Raster Layer and add your name or watermark.
≈ Step 83 ≈
Image / Add Borders / Symmetric - 1 pixel / Color: (6) #4a2546 
≈ Step 84 ≈
Export your work as an optimized .jpg file.
It's over!
I hope you liked it and enjoyed it.

.:. Another version of the tutorial with a tube by SmArt Design .:.
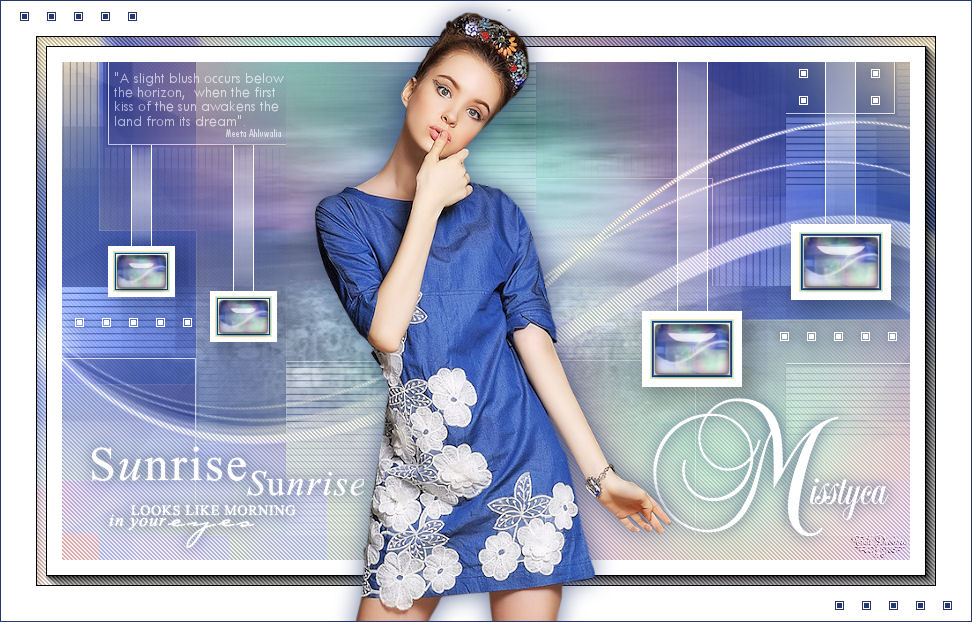

.:. If you want to send me your work with the result of this tutorial, contact me .:.

 .:. Here you can see other versions of the tutorial .:.
