The tutorial:
******
01
Open "TD_Canal_Alfa_Pinuccia"
from tray
Window - Duplicate
This image contains Alpha Selections
Close the original and work with the
Copy
02
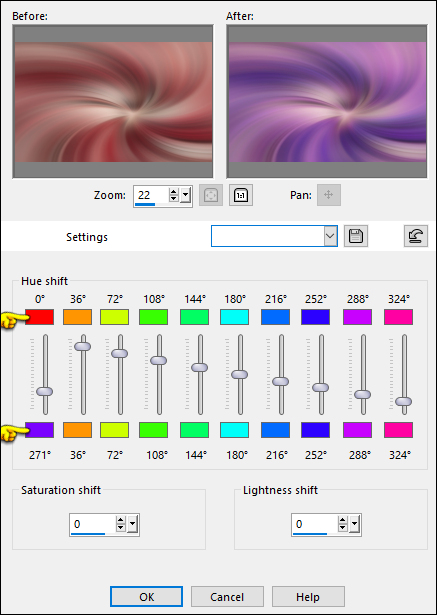
For your colors:
Adjust - Hue and Saturation - Hue Map
03
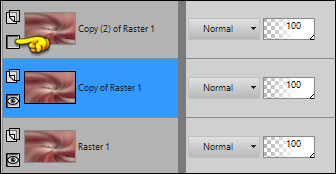
Layers - Duplicate
twice
Close the Top Layer and continue on
the Layer below (Copy of Raster 1)
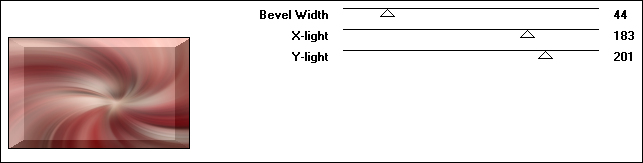
04
Effects - Plugins - Toadies - *Sucking
Toad* Bevel I
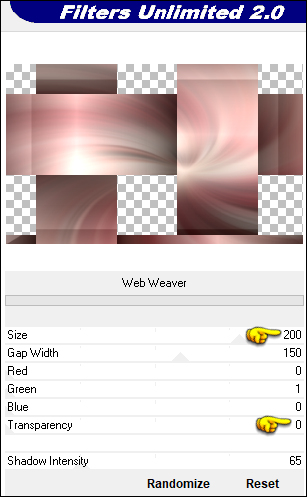
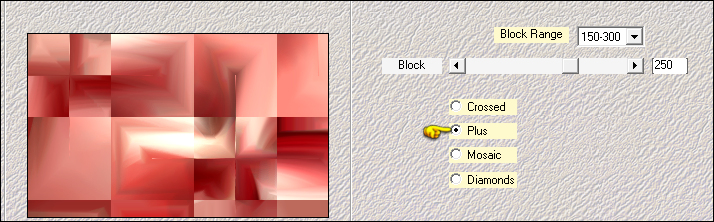
05
Effects - Plugins - Filters Unlimited
- VM 1 - Web Weaver
Effects - Edge Effects - Enhance
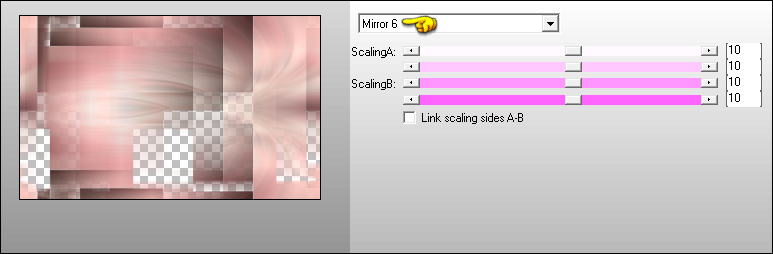
06
Image - Mirror - Mirror Horizontal
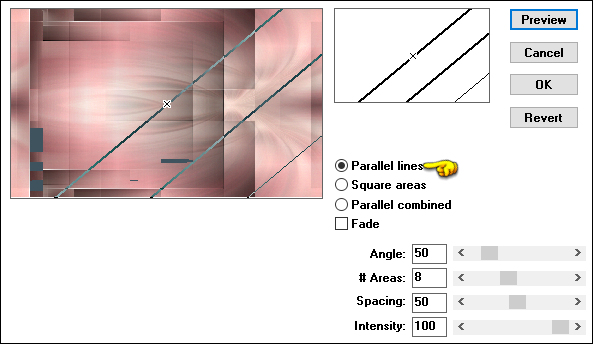
Effects - Image Effects - Seamless
Tiling

07
Edit - Repeat Seamless Tiling
Image - Mirror - Mirror Horizontal
Change the Blend mode to
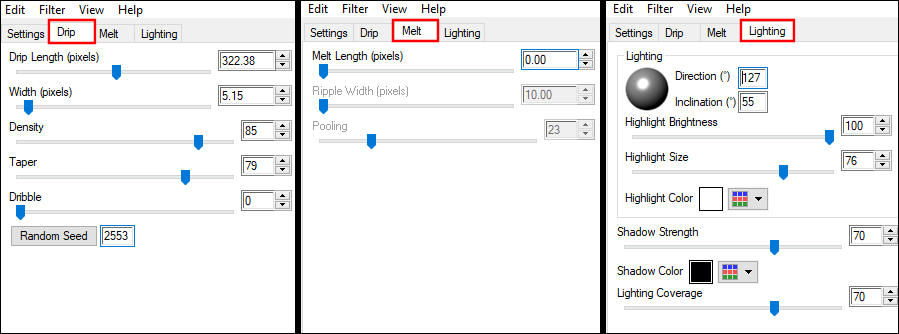
Multiply
08
Layers - Duplicate
Effects - Plugins - AP [Utility] -
Reflections
09
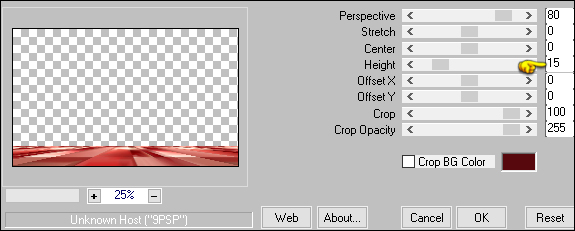
Effects - Plugins - Andromeda - sMulti
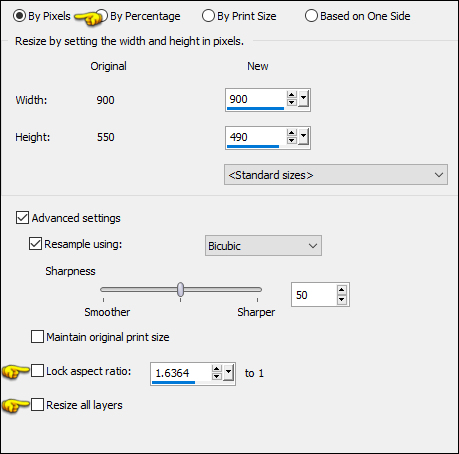
10
Image - Resize - 900 X 490px
11
Effects - Image Effects - Offset
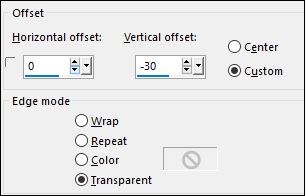
Change the Blend Mode to Hard
Light
12
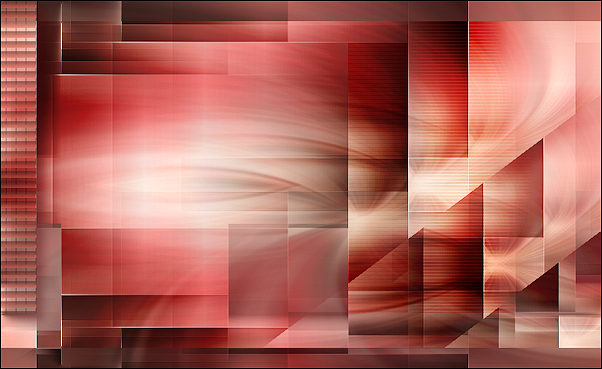
Layers - Merge - Merge Visible
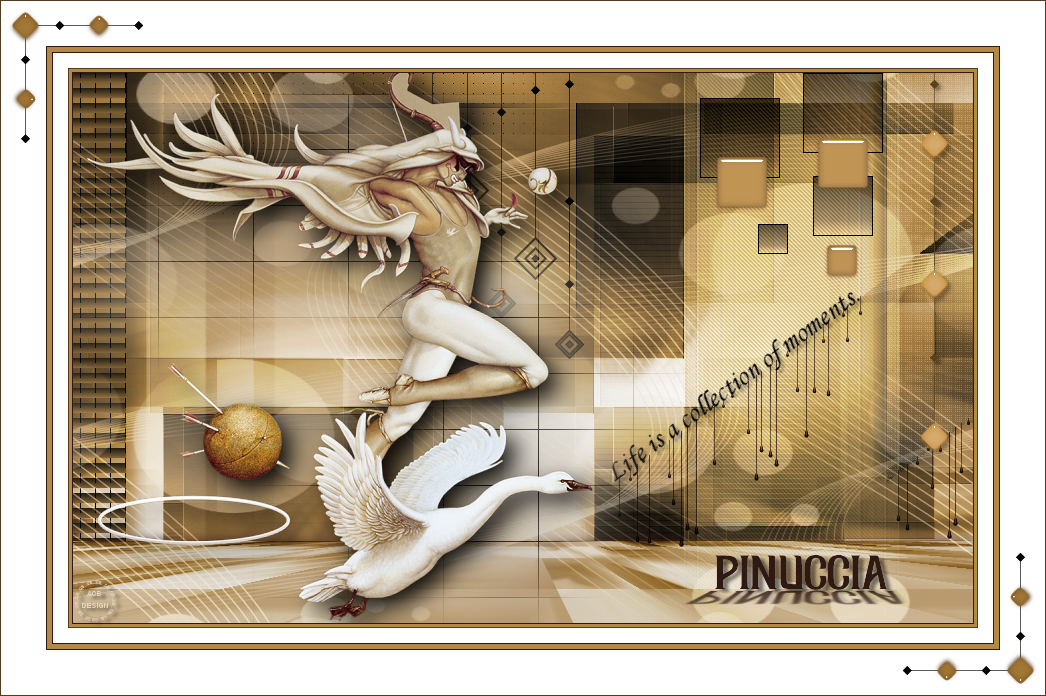
Result:
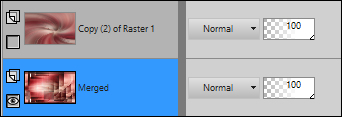
13
Continue with the Bottom Layer Active
Selections - Load/Save - Load
Selection From Alpha Channel - "TD_Pinuccia_Sel1"

Selections - Promote Selection to
Layer
Selections - Select None
14
Effects - Plugins - Carolaine and
Sensibility - cs_texture - Default settings
15
Effects - Distortion Effects - Wind

Change the Blend Mode to
Overlay
16
Activate the Bottom Layer (Merged)
Selections - Load/Save - Load Selection From Alpha
Channel - "TD_Pinuccia_Sel2"
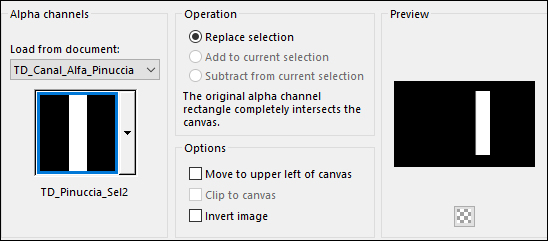
Selections - Promote Selection to
Layer
17
Effects - Plugins - Carolaine and
Sensibility - CS-Halloween2 - Default settings
Selections - Select None
Changeee the Blend Mode to
Soft Light
18
Activate the Bottom Layer (Merged)
Selections - Load/Save - Load Selection From Alpha
Channel - "TD_Pinuccia_Sel3"
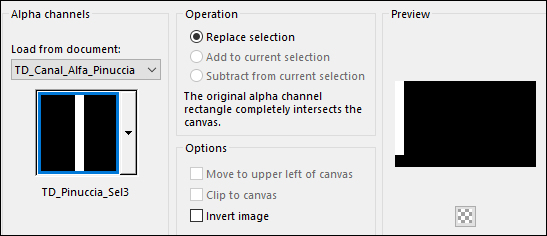
Selections - Promote Selection to
Layer
19
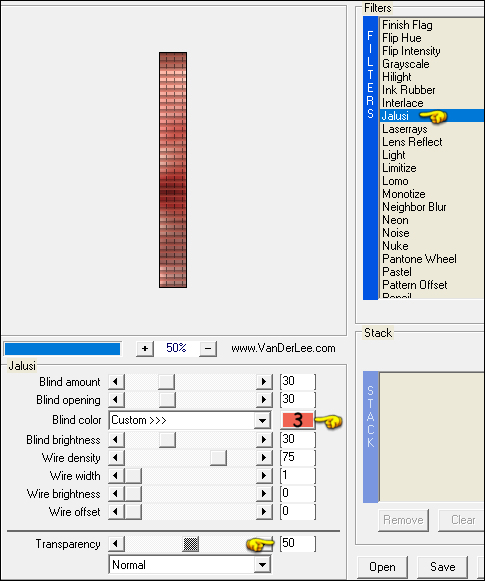
Effects - Plugins - VanDerLee -
Unplugged X - Jalusi - Color 3
Selections - Select None
Effects - 3D Effects - Drop Shadow:
10/10/40/20 Color: #57080d

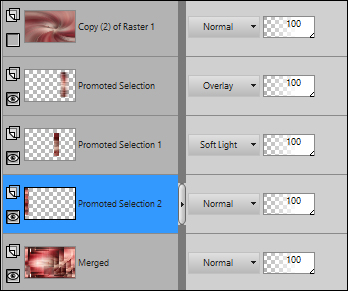
Your work and Layer Palette
should look like this now:
20
Activate the Bottom Layer - (Merged)
Selections - Load/Save - Load Selection From Alpha
Channel - "TD_Pinuccia_Sel4"
Selections - Promote Selection to
Layer
Selections - Select None
21
Effects - Plugins - penta.com - Dot
and Cross
Effects - 3D Effects - Drop Shadow: 0/-10/50/20
Color: #57080d
Change the Blend Mode to
Multiply
22
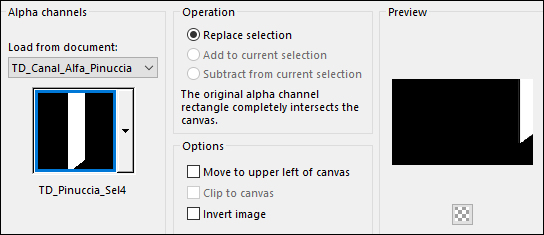
Activate the Bottom Layer (Merged)
Selections - Load/Save - Load
Selection From Alpha Channel - "TD_Pinuccia_Sel7"
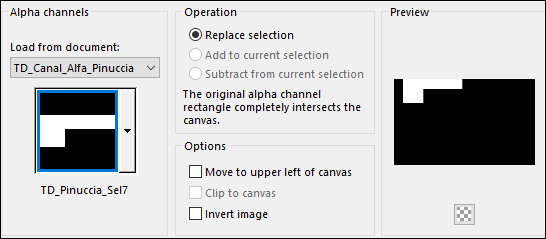
Selections - Promote Selection to
Layer
Selections - Select None
23
Effects - Distortion Effects - Wind -
From Left
24
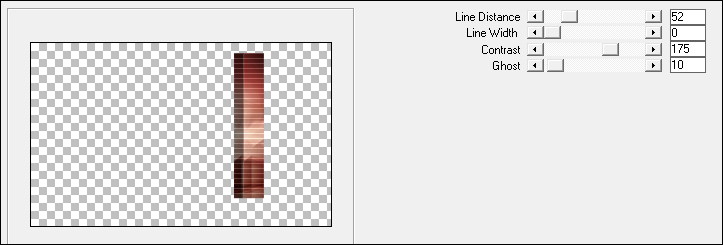
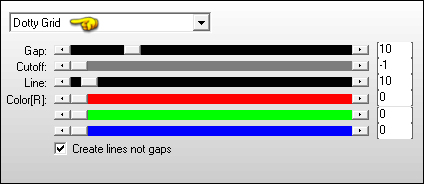
Effects - Plugins - AP [Lines] - Lines
- SilverLining - Dotty Grid
Result:

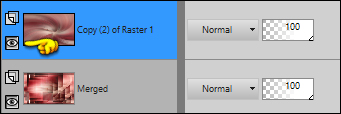
Layers - Merge - Merge Visible
25
Open the Top Layer and Activate it
26
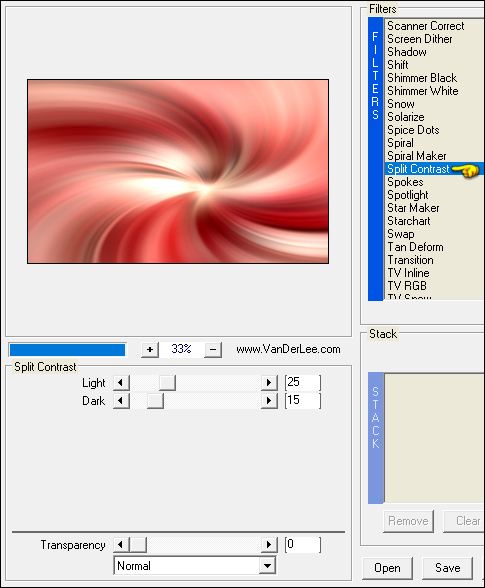
Effects - Plugins - VanDerLee -
Unplugged X - Split Contrast
27
Effects - Plugins - Mehdi - Sorting
Tiles
Effects - Edge Effects - Enhance
28
Effects - Plugins - MuRa's Meister -
Perspective Tiling
Effects - 3D Effects - Drop Shadow: 0/0/100/20
Color: #57080d
29
Open "TD_Deco1_Pinuccia"
Edit - Copy the Active Layer
On your work image: Edit - Paste
- Paste As New Layer
Note: Depending on your colors, you
can use the closed Layer instead
Pick Tool (K)

Enter these parameters for the X: and
Y: positions on the Toolbar
X: 598.00 Y: 0.00
Press M to close the
Pick Tool
30
Open "TD_Deco2_Pinuccia"
Edit - Copy the Active Layer
On your work image: Edit - Paste
- Paste As New Layer
Pick Tool (K)
Enter these parameters for the X: and
Y: positions on the Toolbar
X: 345.00 Y: 0.00
Press M to close the
Pick Tool
31
Layers - New Raster Layer
Selections - Load/Save - Load Selection From Alpha
Channel - "TD_Pinuccia_Sel5"

Fill the Selection with #000000

Note: If you are using different
Colors, you can change to #ffffff

Selections - Select None
32
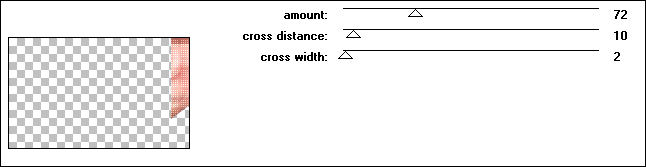
Effects - Plugins - Eye Candy Nature -
Drip - Preset - "TD_Pinuccia_Drip"
Note: If the Preset
didin't install, use these settings:
33
Selections - Load/Save - Load Selection From Alpha
Channel - "TD_Pinuccia_Sel6"
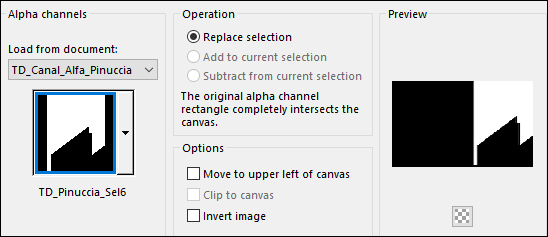
Press the Delete key on your keyboard
Selections - Select None
Change the Blend Mode to
Multiply
Note: If you used White, change the
Blend Mode to Screen
34
Open "TD_Texto_Pinuccia"
Edit - Copy the Active Layer
On your work image: Edit - Paste
- Paste As New Layer
Note: If you are using White, use
Image - Negative here
Pick Tool (K)
Enter these parameters for the X: and
Y: positions on the Toolbar
X: 536.00 Y:
218.00
Press M to close the
Pick Tool
Effects - 3D Effects - Drop Shadow: 3/3/40/5
Color: #57080d
35
Open "TD_Deco3_Pinuccia"
Edit - Copy the Active Layer
On your work image: Edit - Paste
- Paste As New Layer
Pick Tool (K)
Enter these parameters for the X: and
Y: positions on the Toolbar
X: 843.00 Y: 0.00
Press M to close the
Pick Tool
Effects - 3D Effects - Drop Shadow: 3/3/40/5
Color: #57080d
36
Activate Copy 2 of Raster 1 (The
floor)
Layers - New Raster Layer
Fill the Layer with the Background
Color #f3e8d9

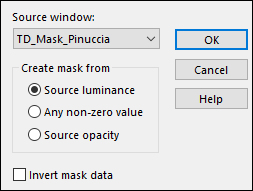
Layers - New Mask Layer - From
Image - "TD_Mask_Pinuccia"
Layers - Merge - Merge Visible
Change the Blend Mode to
Overlay
37
Activate the Top Layer
Layers - New Raster Layer
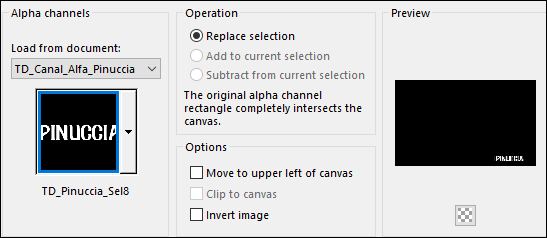
Selections - Load/Save - Load Selection From Alpha
Channel - "TD_Pinuccia_Sel8"
Fill the Selection with #57080d
(Or Black
depending on your Colors)
Selections - Select none
Effects - 3D Effects - Drop Shadow: 3/5/50/5
Color: #57080d
38
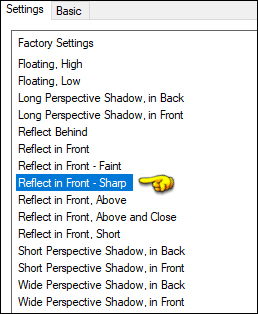
Effects - Plugins - Eye Candy 5 -
Perspective Shadow - Preset - "Reflect in Front, Sharp"
39
Open "2817 - asian - vogue - LB
TUBES9" from tray
Edit - Copy the Middle Layer
On your work image: Edit - Paste
- Paste As New layer
Image - Mirror - Mirror Horizontal
Image - Resize - 85% - Resize All
Layers - Not Checked
Pick Tool (K)
Enter these parameters for the X: and
Y: positions on the Toolbar
X: 69.00 Y: 20.00
Press M to close the
Pick Tool
40
Layers - Duplicate
Activate the Layer below (original
tube)
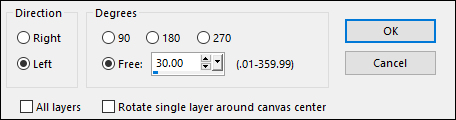
Image - Free Rotate
Adjust - Blur - Gaussian Blur -
Radius: 35
41
Effects - Plugins - Richard Rosenman -
Grid Generator
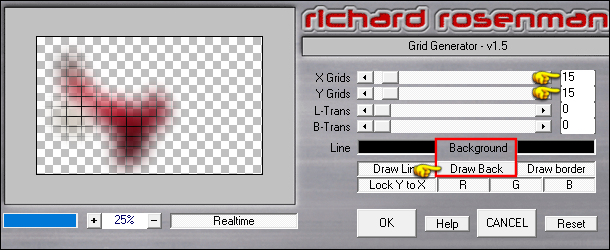
Note: If you are using White for Decos
change the Line Color to White
42
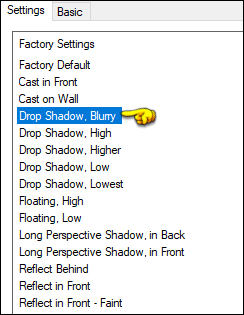
Activate the Top Layer
Effects - Plugins - Eye Candy 5 -
Impact - Perspective Shadow - Preset - "Drop Shadow,
Blurry"
43
Image - Add Borders - Symmetric checked - 1px - #000000
(Or #ffffff)
Image - Add Borders - Symmetric checked - 3px - #b11f28

Image - Add Borders - Symmetric checked - 1px - #57080d
Image - Add Borders - Symmetric checked - 15px - #ffffff
Image - Add Borders - Symmetric checked - 1px - #57080d
Image - Add Borders - Symmetric checked - 5px - #b11f28
Image - Add Borders - Symmetric checked - 1px - #57080d
Image - Add Borders - Symmetric checked - 45px - #ffffff
44
Open "TD_Deco4_Pinuccia"
Edit - Copy the Active Layer
On your work image: Edit - Paste
- Paste As New Layer
Pick Tool (K)
Enter these parameters for the X: and
Y: positions on the Toolbar
X: 6.00 Y: 8.00
Press M to close the
Pick Tool
45