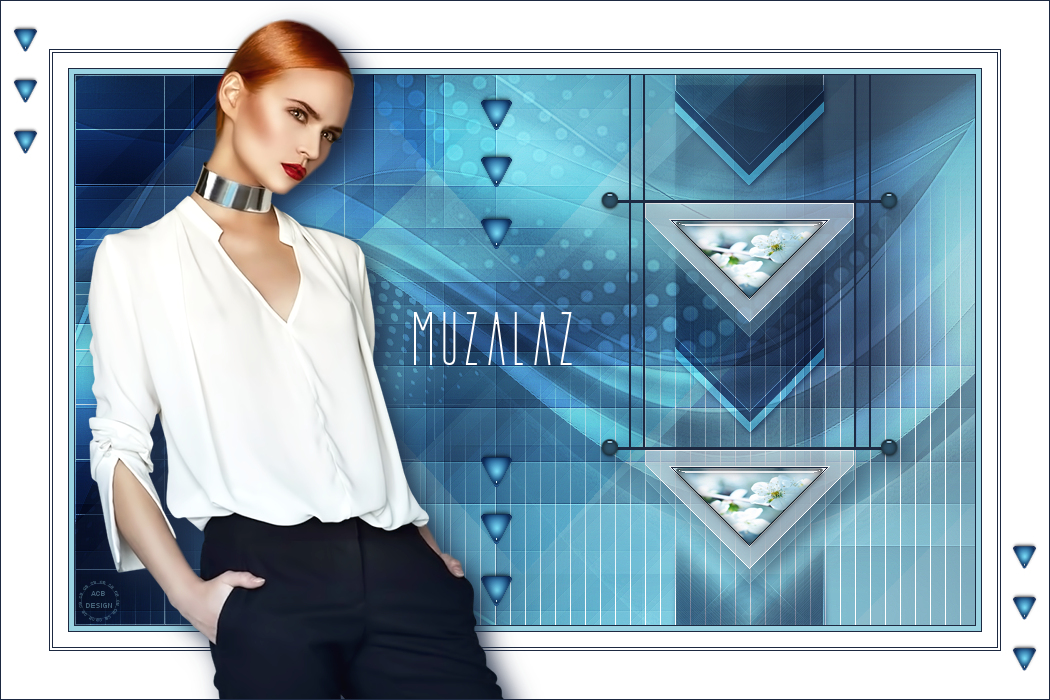
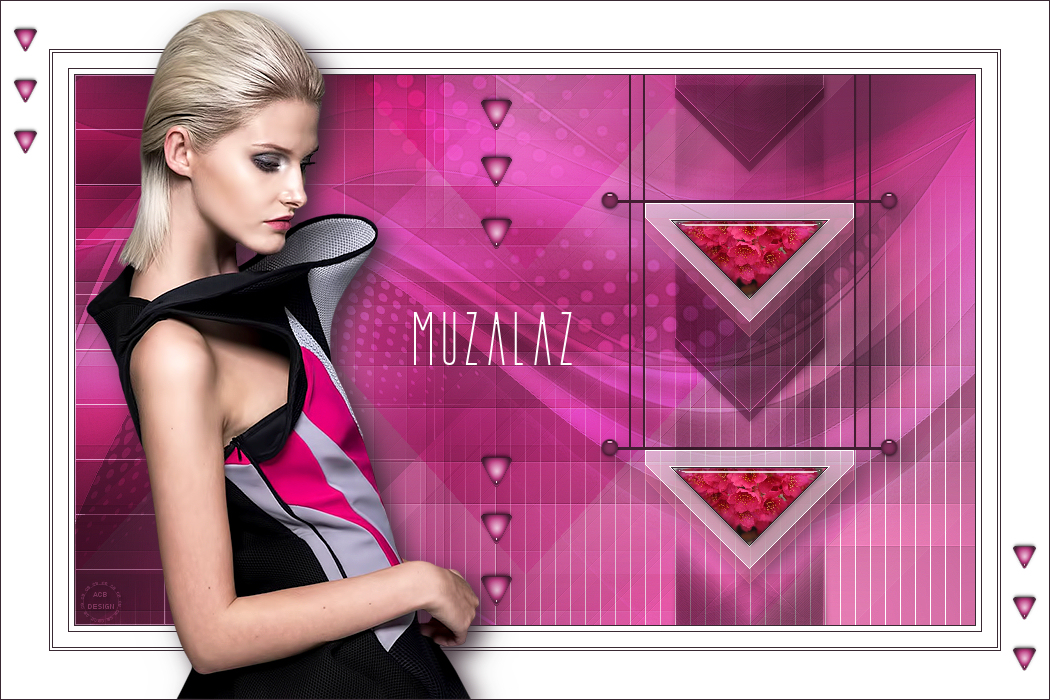
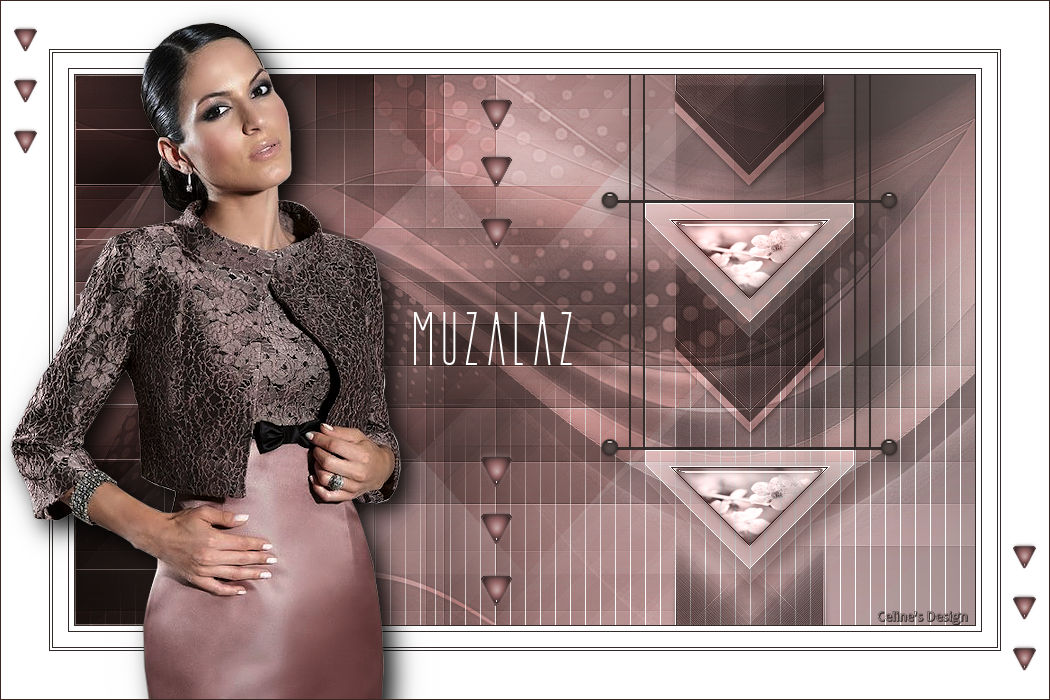
The tutorial:
******
01
Open "TD_Canal_Alfa_Muzalaz"
from tray
Window - Duplicate
Close the original and proceed on the
copy
02
Effects - Plugins - Mehdi - Wavy Lab
1.1 -
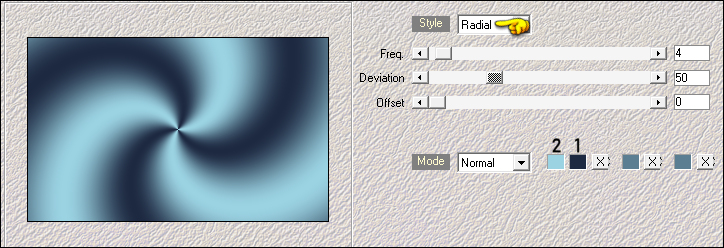
(2) Background (1) Foreground
the other two colors will self adjust
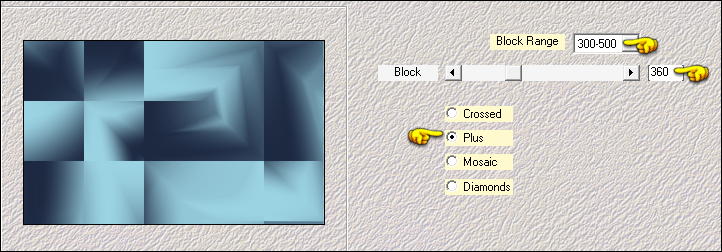
03
Effects - Plugins - Mehdi - Sorting Tiles
04
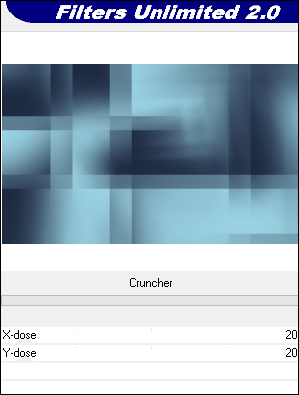
Effects - Plugins - Filters Unlimited
- &<Bkg Designer sf10 I> - Cruncher
05
Effects - Plugins - Filters Unlimited
- &<Bkg Designer sf10 I> - Cruncher
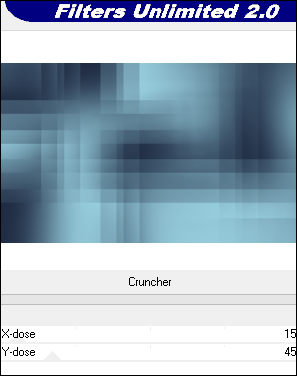
Effects - Edge Effects - Enhance
06
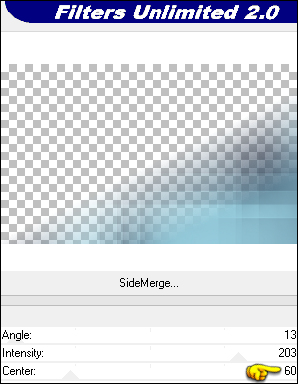
Layers - Duplicate
Effects - Plugins - Filters Unlimited - DC Layer -
SideMerge
07
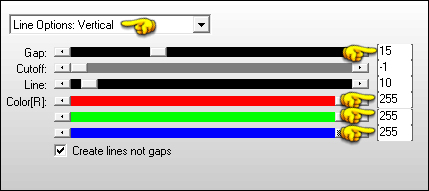
Effects - Plugins - AP [Lines] - Lines
- SilverLining
08
Activate the Bottom Layer
Layers - Duplicate
Layers - Arrange - Bring to Top
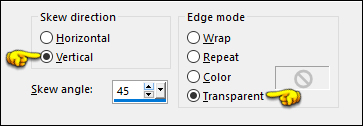
09
Effects - Geometric Effects - Skew
10
Effects - Plugins - VanDerLee -
Unplugged X - Defocus

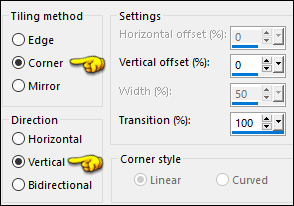
11
Effects - Image Effects - Seamless
Tiling
Change the Blend Mode to
Overlay
12
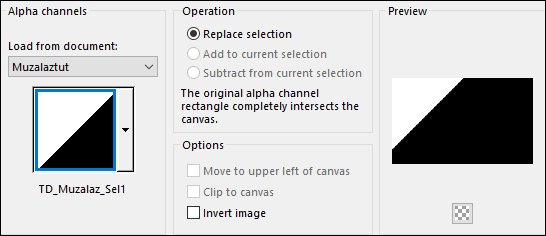
Activate the Bottom Layer
Selections - Load/Save - Load
Selection From Alpha Channel - "TD_Muzalaz_Sel1"
Selections - Promote Selection to
Layer
Selections - Select None
Layers - Arrange - Bring to Top
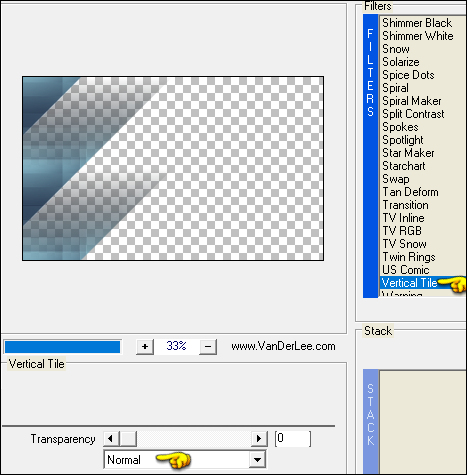
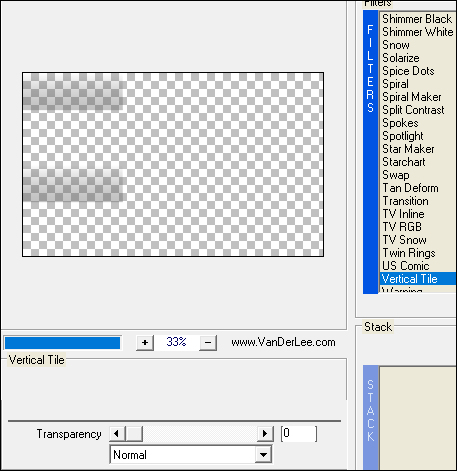
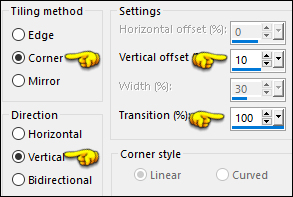
13
Effects - Plugins - VanDerLee -
Unplugged X - Vertical Tile
14
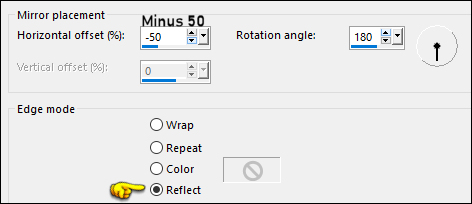
Layers - Duplicate
Effects - Reflection Effects -
Rotating Mirror
15
Effects - Image Effects - Seamless
Tiling
Change the Blend Mode to Soft
Light
16
Activate the Layer below (Promoted
Selection)
Effects - Plugins - Richard Rosenman -
Grid Generator - Foreground Color

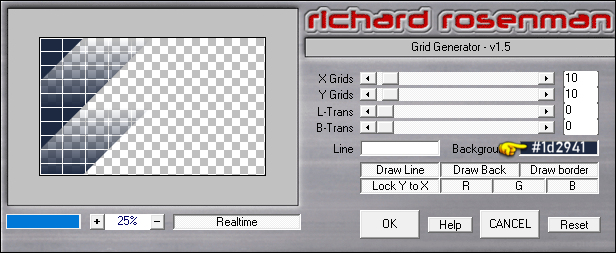
Change the Blend Mode to Soft
Light
17
Activate the Top Layer (Copy of
Promoted Selection)
Layers - New Raster Layer
Selection Tool (S) - Custom Selection

Fill the Selection with #ffffff

Selections - Select None
18
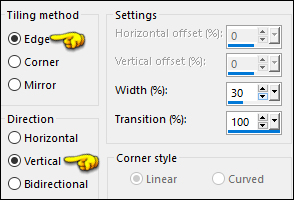
Effets- Plugins - VanDerLee -
Unplugged X - Vertical Tile
Effects - Edge Effects - Enhance
19
Effects - Geometric Effects - Skew
20
Effects - Image Effects - Seamless
Tiling
Effects - Plugins - Simple - Centre
Tile
21
Effects - Image Effects - Seamless Tiling
22
Image - Mirror - Mirror Horizontal
Effects - Edge Effects - Enhance
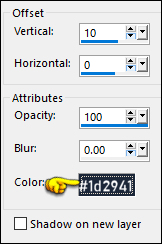
Effects - 3D Effects - Drop Shadow
23
Layers - New Raster Layer
Selections - Load/Save - Load Selection From Alpha
Channel - "TD_Muzalaz_Sel2"
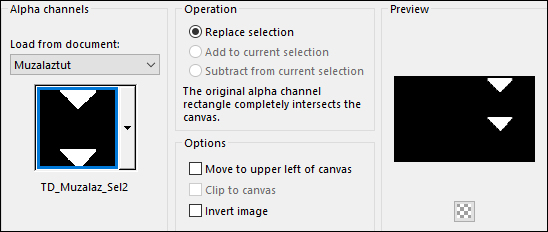
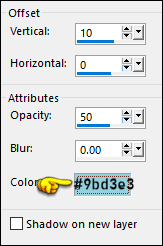
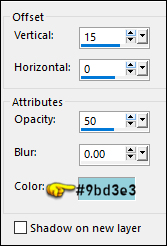
Effects - 3D Effects - Drop Shadow
Selections - Select None
Layers - Merge - Merge Down
Change the Blend Mode to Hard
Light
24
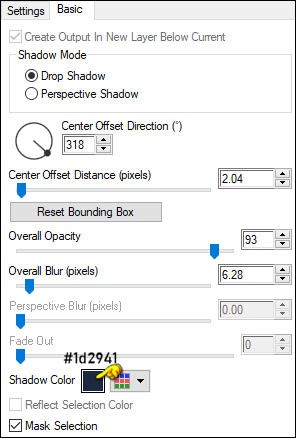
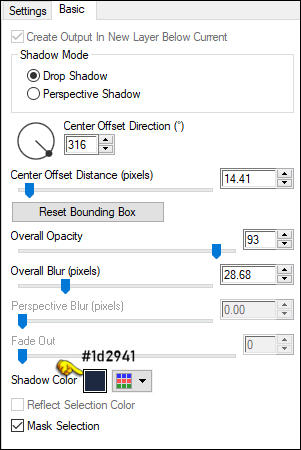
Effects - Plugins - Eye Candy 5 -
Impact - Perspective Shadow - Preset - Drop Shadow,
Lowest
Click on the Basic Tab and change the
Shadow Color to #1d2941
25
Layers - New Raster Layer
Selections - Load/Save - Load Selection From Alpha
Channel - "TD_Muzalaz_Sel3"
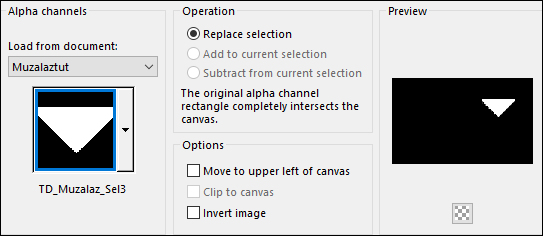
Fill the Selection with #ffffff
Selections - Modify - Contract - 1px
Press the Delete key on your keyboard
Keep selected
26
Lower the Opacity of the Flood Fill
Tool to 50
Fill the Selection with #ffffff
Raise the Opacity of the Flood fill
Tool back to 100
Selections - Modify - Contract - 15px
Fill the Selection with #ffffff
Selections - Modify - Contract - 1px
Fill the Selection with #1d2941
Selections - Modify - Contract - 1px
Keep selected
27
Open "imagen_flores" from tray
Edit - Copy
You can close this image now
On your main work image: Edit -
Paste - Paste Into Selection
Effects - Plugins - Eye Candy 5 - Impact - Glass - Preset - Clear
Adjust - Sharpness - Sharpen
Selections - Select None
Effects - 3D Effects - Drop Shadow
28
Layers - Duplicate
Pick Tool (K)

Enter these parameters for the X: and
Y: positions on the Toolbar
X: 570.00 Y: 375.00
Press M to close the
Pick Tool
Layers - Merge - Merge Down
29
Effects - Plugins - Eye Candy 5 - Impact - Perspective
Shadow - Preset - Drop Shadow Blurry
In the Basic Tab, Change the Shadow
color to
#1d2941
30
Change the Foreground Color to #9bd3e3
 and
the Background color to #ffffff
and
the Background color to #ffffff
Set your Foreground
to Gradient (Corel_06_029) - Style:
Linear
31
Activate the third Layer down from the
Top (Copy of Promoted Selection)
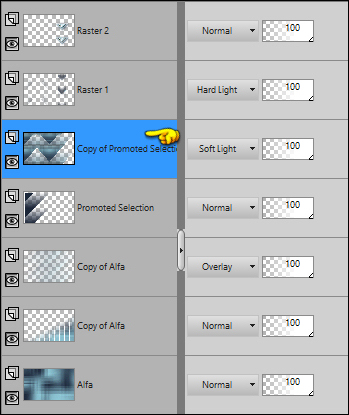
Layers - New Raster Layer
Fill with the Gradient

32
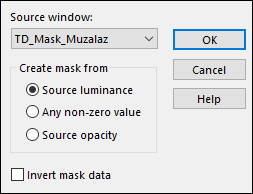
Layers - New Mask Layer - From Image -
"TD_Mask_Muzalaz"
Layers - Merge Group
Adjust - Sharpness - Sharpen More
Change the Blend Mode to
Overlay
33
Open "TD_Deco1_Muzalaz" from
tray
Edit - Copy the Middle Layer
On your work image: Edit - Paste -
Paste As New Layer
Layers - Arrange - Bring to Top
Pick Tool (K)
Enter these parameters for the X: and
Y: positions on the Toolbar
X: 523.00 Y: 0.00
Press M to close the
Pick Tool
34
Effects - Plugins - Eye Candy 5 -
Impact - Perspective Shadow - Preset - Drop Shadow
Blurry
In the Basic Tab, Change the Shadow
color to #1d2941
35
Open "TD_Deco2_Muzalaz" from
tray
Edit - Copy the Middle Layer
On your work image: Edit - Paste -
Paste As New Layer
Layers - Arrange - Bring to Top
Pick Tool (K)
Enter these parameters for the X: and
Y: positions on the Toolbar
X: 402.00 Y: 17.00
Press M to close the
Pick Tool
36
Open "TD_Titulo_Muzalaz" from tray
Edit - Copy the Middle Layer
On your work image: Edit - Paste - Paste As New Layer
Pick Tool (K)
Enter these parameters for the X: and
Y: positions on the Toolbar
X: 339.00 Y: 237.00
Press M to close the
Pick Tool
37
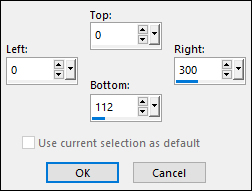
Image - Add Borders - Symmetric
checked - 1px - #1d2491
Image - Add Borders - Symmetric checked - 5px -
#ffffff
Image - Add Borders - Symmetric checked - 1px -
#1d2491
Image - Add Borders - Symmetric checked - 15px -
#ffffff
Image - Add Borders - Symmetric checked - 1px -
#1d2491
Image - Add Borders - Symmetric checked - 2px -
#ffffff
Image - Add Borders - Symmetric checked - 1px -
#1d2491
Image - Add Borders - Symmetric checked - 48px -
#ffffff
38
Open "TD_Deco3_Muzalaz from tray
Edit - Copy the Middle Layer
On your work image: Edit - Paste
- Paste As New Layer
Pick Tool (K)
Enter these parameters for the X: and
Y: positions on the Toolbar
X: 10.00 Y: 22.00
Press M to close the
Pick Tool
39
Open "Femme 708 by Lily" from tray
Erase the watermark
Edit - Copy
On your work image: Edit - Paste -
Paste As New Layer
Pick Tool (K)
Enter these parameters for the X: and
Y: positions on the Toolbar
X: 82.00 Y: 14.00
Press M to close the
Pick Tool
Note: If you are using
a different tube: Resize to fit
Edit - Paste - Paste As New Layer
Move to the Left (See Example)
40
Effects - Plugins - Eye Candy 5 - Impact - Perspective
Shadow - Preset - Drop Shadow Blurry - Same settings
Image - Add Borders - Symmetric checked - 1px -
#1d2491
41